
A simple guide to page stickers
How to add or remove a sticker in Stilopad
Choose a sticker from your collection, place it on a page, and remove only the page copy when you are done.
Open a notebook, then add a little picture to your page. If you change your mind, remove that copy without losing the reusable sticker.
Add and remove a sticker on Android
Place a sticker, remove its copy and keep it in your collection
Step 1 of 8 — Start on the notebook page
The editor entry, Add sheet, My stickers tray, selected-page toolbar and reusable tile are real Android captures. The toolbar close-up and page deletion result are crops from immutable full-screen captures. Resizing, animated-sticker behaviour and Web Lite sticker controls were not tested in this batch.
Add and remove a sticker on Android
Add and remove a sticker on Android
Start on the notebook page
The notebook is open with a photo already on the page. Tap Add in the bottom toolbar to open choices for this same page.
Choose Sticker
The Add sheet opens over the same notebook. Tap Sticker, the first tile in the second row.
Choose from My stickers
The Sticker tile opens the real reusable-sticker tray. Tap Sunny daisy to place one copy on this notebook page.
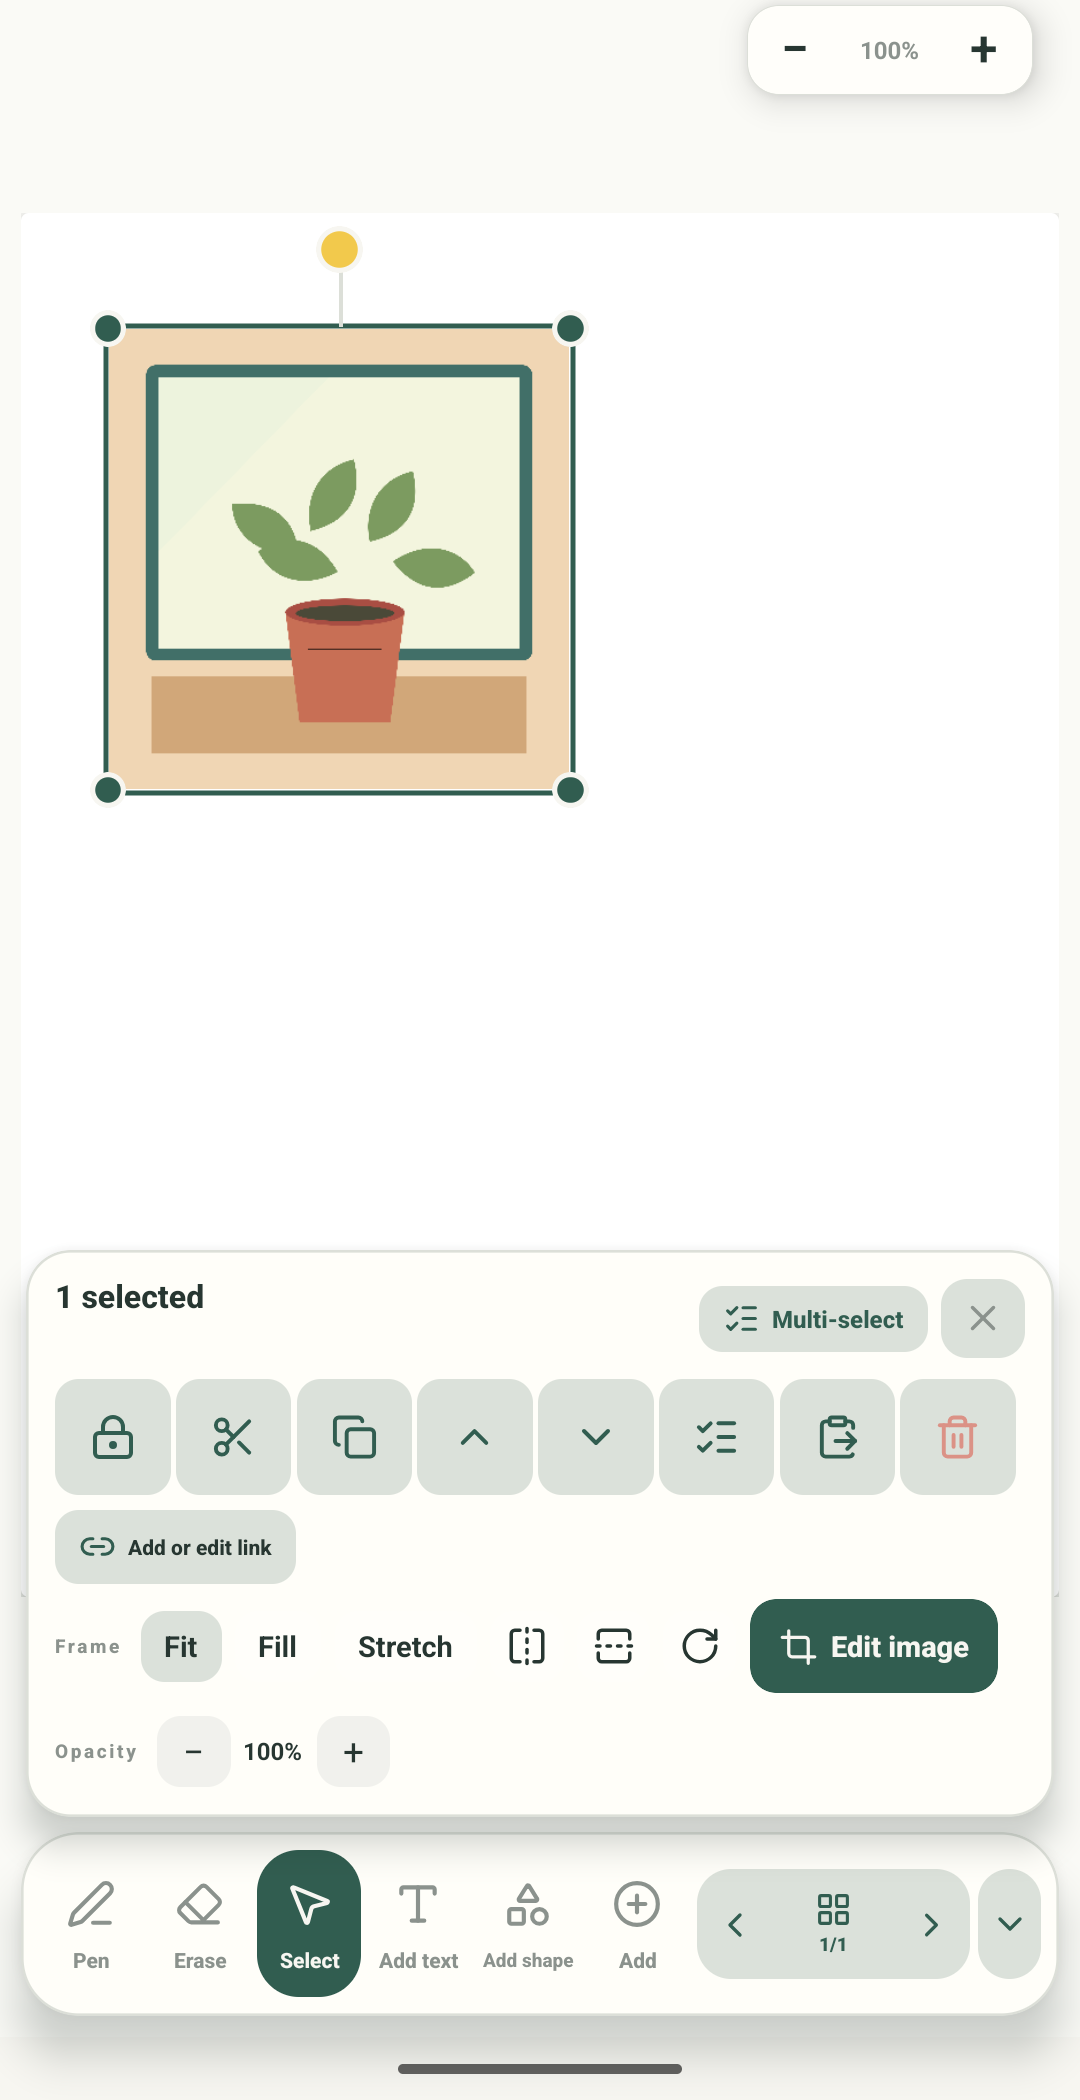
Select the page copy
Sunny daisy appears selected on the page. The four green handles belong to this sticker; the Sticker toolbar below controls this page copy.
Read the Sticker toolbar
This close-up is cropped from that real selected-sticker screen. It shows Lock, Cut, Copy, Bring forward, Send backward, Multi-select, Paste and Delete; below are link, opacity, Fit/Fill/Stretch, flip, rotate and Edit image for this still picture. These controls change the page copy, not the reusable collection item.
Remove only this page copy
Tap the red bin at the far right of the action row. It removes Sunny daisy from this page, not from My stickers.
See the clear page result
The daisy page copy is gone. The plant picture and “Remember the picnic snacks” note are still there. This close crop comes from the real page after Delete; the Add sheet is outside the crop.
Check the collection
The captured Android collection still shows its Sunny daisy tile after the page copy is removed. Your own collection may have different stickers.
The guide shows the actual Add sheet, My stickers picker, selected sticker and its object toolbar. The same custom daisy was added to the test page, deleted from that page and then found still available in the sticker collection.
On Web Lite
On Web Lite
Open a notebook and choose Sticker from the editor toolbar or Add menu.
In the actual My stickers tray, choose a saved sticker to place it on the page. The Web Lite route was not tested in this batch.
Select the sticker and choose Delete to remove its page copy. Web Lite sticker controls were not checked in this batch.
A page copy is not the collection item
Deleting the selected sticker removes that copy from the current page. In this test, its reusable tile remained in Your stickers and could be added again.
Keep the sticker you may reuse
The test confirms the collection item stayed available after page deletion. Check Saved before leaving the notebook.
If the wrong thing is selected
- Choose Select and tap a visible part of the sticker. When objects overlap, try an edge that is not covered.
- If a lock is shown, unlock the sticker before moving or editing it.
- Use Delete only after checking the selected object toolbar. This example deletes a page copy, not the reusable collection item.